Archive for October, 2013
 Gary’s Honey-Rosemary Tomato Sauce
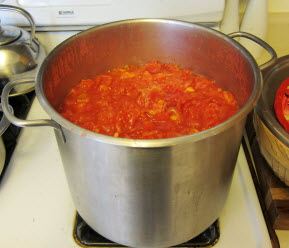 Here is a very subtle and delicious tomato sauce taught to me by my erstwhile, good food-loving friend Gary. You may wonder at its simplicity: the lack of spices, garlic, even pepper and salt. But it is the omission of these stronger flavors that allows its “secret” ingredient–honey–to shine.
This is a sauce best left simple. It goes especially well with heartier pastas…gnocchi or bow-tie, for example, where it compliments without overshadowing the pasta’s own meaty flavor.
- Prep Time: 5 minutes
- Cooking Time: 90 minutes
- Servings: Makes 1/2 gallon, approximately 16 servings
Ingredients
- Two 32 oz cans of crushed tomatoes
- 1-2 shallots or 1 small onion, minced
- Honey
- Fresh rosemary
Directions
- In a pot, heat olive oil and then sautee the shallots/chopped onion until soft.
- Add the tomatoes and cook at medium heat.Bring to low boil then reduce heat to medium low.
- Add 1-2 tablespoons of honey. Stir and taste it as you add…you don’t want the sauce to be too sweet.When honey is right, add a 4 to 6 inch sprig of rosemary.
- Cook for 15 minutes or so then taste to determine if it needs a little more rosemary. Be careful: Too much rosemary can ruin it so be judicious in adding it.
- Cover and cook at low heat for an additionaal 45-60 minutes, stirring occasionally to keep from burning.Remove rosemary before serving.
Authentic Italian Tomato Sauce
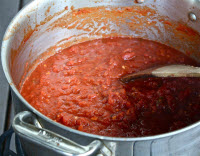 This recipe comes to me from an Italian friend who wrote: “Mike, once you do this (if you enjoy cooking) you will never buy sauce from a jar again in your life. I make HUGE pots of gravy–freeze it in family size portions and have it for dinner for weeks.”
The basic sauce is quite simple. If you prefer, you can dress it up using a number of variations.
- Prep Time: 15 minutes
- Cooking Time: 2-4 hours
- Servings: Makes 1 gallon of sauce
Ingredients
- 3 or 4 cans of whole plum (Italian) tomatoes (I prefer San Marzanos)
- 1 can tomato puree
- 2 tbsp olive oil
- 3-4 cloves of garlic, minced
- 1/2 medim onion, chopped
- 4-5 basil leaves
- Salt and pepper
Directions
- Blend the whole tomatoes, smooth or chunky, according to your preference.
- In a large pot, heat the olive oil. Add the garlic and onion and fry lightly. Do not brown the garlic; just let the garlic and onion get soft and infuse the oil.
- Add blended tomatos and puree and bring to a boil.
- Stir and reduce heat to a simmer. For a thinner sauce, cover pot. For a thicker sauce, do not cover. Cook for two hours or more. Add salt and pepper to taste.
Stir constantly to avoid burning the sauce. - When the sauce is just about done add basil leaves and cook a little longer.
Preparation/Cooking Notes
- Be careful not to burn sauce. Keep heat low and stir often.
- The same is true of the garlic/onion; be careful not to brown it or the sauce will have a burnt taste. If you accidentally do, better to throw it out and start again.
Variations
- Fry some Italian sausages and add to the pot.
- Lightly fry up 2-3 country style spare ribs (the really meaty ones) and add them to the pot. After about 4 hours of simmering, the meat of the ribs just falls off the bone in shreds and makes for a very nice texture/taste. As an alternative, instead of ribs add 1 or 2 lightly fried Braciola.
- In the olive oil/garlic/onion mix, prior to adding the tomatoes, add a full tube of double-strength San Marzano tomato paste and cook well. This infuses the oil/veggie mixture into the paste.
- Add one or more of the following to the sauce: fresh parsely, more basil, oregano, a few bay leaves, 1 or 2 thin strips of green bell pepper.
Pea Soup
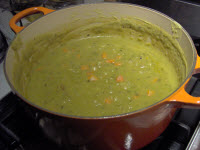 Here’s a hearty soup that is the ultimate in comfort food–it comforts you as you prepare it. The aroma is very soothing, and it tastes AWESOME!
- Prep Time: 15 minutes
- Cooking Time: 1.5 hours or more
- Servings: 8
Ingredients
- 1 16 oz bag dry split green or yellow peas, rinsed
- 2 tbsp olive oil
- 1 medium yellow onion, chopped fine
- 2-3 cloves of garlic, minced. Cut cloves lengthwise and remove the green shoot (which tends to be too strongly-flavored)
- 2-3 carrots cut into small rounds or 1 cup mini pre-peeled carrots
- 2 stalks of fresh celery chopped into 1/2 inch pieces
- 1 tsp each parsley, thyme, rosemary, sage
- 2 or 3 bay leaves
- Salt and pepper to taste
Directions
- In a stock pot, heat the oil and saute the onions until translucent. (If you choose to include a leak–see Variations–add it to the saute after the onion and before the garlic.) Add the garlic and saute another minute or so. Be very careful not to burn or brown the garlic.
- Once the onions/leek/garlic are soft, add the peas. Add water, enough to completely cover the peas plus an extra inch and a half extra. Set heat to medium flame. Add the carrots, celery, and herbs.
- Bring the soup to a boil. Cover the pot and reduce heat to simmer. Cook for one hour at least, stirring occasionally. The peas will soften as they cook and absorb the water. The soup is ready when the peas have all lost their shape and dissolved into a paste. Until that occurs, keep on cooking. Add salt and pepper to taste. A good starting point is 1/2 tsp salt and 1/4, then stir well and increase incrementally as desired.
- Remove soup from heat and let sit for twenty minutes. Serve with good crusty bread,
Cooking Notes
At any point while cooking, if the soup becomes too thick add more water, one cup at a time.
Even after the soup is ready, additional slow cooking will allow flavors to concentrate. Always a plus if you have the time.
Variations
- If desired, you can substitute lentils for the peas
- To include meat, add a ham bone (ask the butcher at the store), pork ribs, hot dogs, or sausage. This gives it a nice hearty flavor. Add the ham bone once the soup begins to boil. Add hot dogs or sausage 1/2 hour in.
- You can include one small leek. Cut it lengthwise down the middle, separate and leaves and wash well ( leeks tend to have a lot of sand in them). Then chop the leek in 1 inch squares and add to the sauteing onions.
Serving Notes
My mother Giselle often made croutons by frying up small pieces of dry French bread (or any kind of dry bread) in a pan on the stove. Just cut up the dry bread into spoon size pieces and fry until golden and crunchy. Then put a few pieces of the fried bread in each person’s bowl and ladle the soup over it.
The soup will tend to thicken in the refrigerator. When reheating, add a little water as necessary to thin it.
No Knead Bread
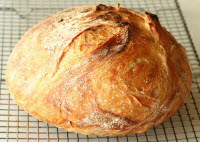 This bread was originally introduced to me by my brother Dan, who read about it in the New York Times. Extremely easy to make, absolutely delicious, and open to endless variations. All it takes to make is patience and a willingness to experiment. The results will rival the best bread you get at bakeries, if not surpass them. It’s also a wonderful group project if you have children 6 or older, allowing each child to make his or her own loaf.
- Prep Time: 10 minutes
- Rise Time: 12-18 hours + another 2 hours
- Baking Time: 45-60 minutes
- Servings: One 1½-pound loaf
Ingredients
- 3 cups all-purpose or bread flour, more for dusting
- ¼ teaspoon yeast
- 1¼ teaspoons salt
- 3-4 drops to 1/4 tsp red wine vinegar
- 1 and 5/8 cups very warm (almost hot) water
- Cornmeal or wheat bran as needed.
Other Necessaries:
- Plastic wrap
- Cotton towel (see preparation notes for alternative)
- A covered baking vessel (dutch oven, corningware, loaf pan w/ foil)
Directions
-
In a large bowl combine flour, yeast and salt. Add 1 5/8 cups water and red wine vinegar, and stir until blended; dough will be shaggy and sticky. Cover bowl with plastic wrap. Let dough rest at least 12 hours, preferably about 18, at warm room temperature, about 70 degrees.Dough is ready when its surface is dotted with bubbles.
-
Lightly flour a work surface and place dough on it; sprinkle it with a little more flour and fold it over on itself once or twice. Cover loosely with plastic wrap and let rest about 15 minutes.
-
Using just enough flour to keep dough from sticking to work surface or to your fingers, gently and quickly shape dough into a ball. Grease a mixing bowl and generously coat with flour, wheat bran or cornmeal; put dough in bowl and dust with more flour, bran or cornmeal. Cover and let rise for about 2 hours. When it is ready, dough will be more than double in size and will not readily spring back when poked with a finger.
-
At least a half-hour before dough is ready, heat oven to 450 degrees. Put a 6 to 8 quart heavy covered pot (cast iron, enamel, Pyrex or ceramic) in oven as it heats. When dough is ready, carefully remove pot from oven and empty dough into pot. You may have to scoop some of the dough out with your hands or a spoon and it may look like a mess, but that is O.K. Shake pan once or twice if dough is unevenly distributed; it will straighten out as it bakes. Cover with lid and bake 30 minutes, then remove lid and bake another 15 to 30 minutes, until loaf is beautifully browned. Cool on a rack.
Preparation/Cooking Notes
- The original recipe calls for instant yeast, but at Dan’s recommendation I’ve used regular yeast and seen little difference in how the bread comes out.
- If you read around on the web, you’ll find a lot of people experimenting with shorter rise times, in some cases increasing the yeast, sometimes not. One cook used a shorter rise time (just a few hours) with no added yeast but suggested a narrower bowl. Another cook even claimed excellent results letting her dough rise while in the fridge. So experiment, but I’d try the original recipe first. If it’s winter and your rooms don’t come close enough to 70 degrees, try placing the bowl atop an appliance (like the fridge), in an unheated over, or even atop a radiator.
- One thing I’ve never quite figured out…I always expect this bread to rise more than it does. My loaves are consistently four to five inches at their highest point. Maybe that’s as should be, but I wish I could get them a little higher. I’ve tried tweaking the amount of yeast, elongating the rise time, warming the rising bread, but it largely has not made a difference.
- For steps 2 and 3, wetting your hands will help prevent the dough from sticking to them.
- Step 3 originally called for a cotton towel, not a greased mixing bowl. I made the change after finding the dough stuck to the towel too often.
Variations
The possibilities are almost limitless, from flours you can use, to herbs, spices, and other additions you can mix into the dough, to toppings for the crust. I’ll add a few of the things I’ve tried later.
Serving Notes
This bread, amazingly, actually gets better over the course of several days. One caution: unless you’re very, very good, wait for it to cool fully before attempting to slice sandwich-thin.
Sauteed Green Beans
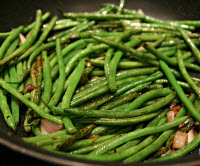 There are very few things in this world that don’t taste good sauteed in butter and garlic. Here is a very simply recipe for green greens that is delicious, easy to make, and tastes nearly as good the second and third day as it is the first.
Ingredients
- 1 lb green beans
- 2 cloves garlic, minced
- 2 tbsp butter
Directions
- Prepare green beans by removing tips. Peel and mince the garlic cloves.
- In a saucepan or pot, add about 1-2 inches of water and bring to a boil. Lower heat to a simmer. Add the green beans and cover the pot.
- Steam the beans until al dente, approximately 10 minutes. Test often by biting a bean. You want them soft enough to eat yet still retaining a bit of crunch. At any point while cooking if the water gets too low toss in another cup.
- When the beans are ready, remove from heat and drain in colander. Allow them to rest long enough so that their skins dry (this will allow them to bind with the butter/garlic).
- In a saucepan over medium heat, melt butter until it begins to sizzle lightly. Add garlic and sautee for about a minute, taking care not to burn the butter.
- Lower the heat and add the green beans. Toss thoroughly to coat them with butter. Cook over low heat, tossing occasionally, for about 5 minutes or until sufficiently hot.
Variations
If desired, in place of butter you can use 1 tbsp of olive oil. Olive oil is lass flavorful than butter but is more forgiving when it comes to burning.
Serving Notes
- These work quite well as leftovers. Just microwave.
- If you’re a vegetarian (or even if you’re not) try these over a bed of rice or mashed potatoes for a fast and very satisfying meal.
Green Pepper and Tomato Salad
If you love tomatoes, and especially if you grow your own (or have access to homegrowns), here’s a tangy, tasty salad that stars them front and center. It was a staple in my house growing up, appearing in my mother’s repertoire from mid-summer through fall, as the homegrown tomato crop came in.
- Prep Time: 15 minutes
- Servings: 6
Ingredients
- 8 medium (baseball-sized) tomatoes cut into wedges 1/2″ to 1″ wide
- 4 medium-large green bell peppers, seeded and cut into bite-sized chunks
- 1 medium onion, halved and then sliced thinly
Directions
- In a salad bowl, prepare Giselle’s Vinaigrette.
- Chop the tomatoes, peppers, and onions and add to the bowl.
- Toss well before serving.
Preparation Notes
- A key to this recipe is good tomatoes: ripe, sweet, succulent, flavorful. If all you have access to are the thick, dry, pulpless, flavorless market tomatoes one is often limited to out of season, give it a miss.
- If the tomatoes are especially pulpy, prior to adding them to the salad, allow them to drain in a colander or even use a knife to remove some of the pulp. Otherwise the salad can become “soupy.”
- Green bell peppers are also fairly essential: both in the flavor they bring and in the pleasing contrast their color adds to the tomatoes. Red bells, while great in many other things, are too sweet for this salad, and green fryers are too thin-walled. Stick with green bells, at least the first time you make it. You may get good results experimenting with other non-red balls such as yellows.
- Generally this salad works best as is. I’ve tried adding cucumber slices and found they added little, in fact detracted from the presentation. If you have some fresh basil on hand, one or two teaspoons minced can be a nice addition.
- While you don’t need to use Giselle’s Vinaigrette, do be sure to use a vinaigrette as the dressing for this salad. Use one that does not overpower, but allows the natural flavors of the tomatoes and peppers to own center stage.
Serving Notes
- Salad can be served lightly chilled or at room temperature.
- Unlike green salads, which go soggy and become inedible within several hours of tossing, this salad can keep for several days. It is often even better the second day, when the flavors from the tomatoes and peppers have had time to coalesce with the vinaigrette.
Giselle’s Vinaigrette
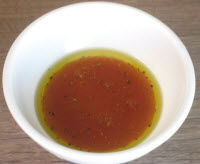 This simple vinaigrette recipe came to me from my mother. Coming from French peasant stock, a salad was always a part of every dinner meal, and the dressing was always a vinaigrette such as this, not the creamy concoctions that have become popular in American cooking.
In addition to its obvious use with salads, this vinaigrette also makes an excellent marinade for white meats like chicken or fish. Scale the ingredients up to make the quantity you need.
Ingredients
- 2 tbsp olive oil
- 1 tbsp red wine vinegar
- 1/2 tsp salt
- 1/4 tsp fresh ground black pepper
- 1 smallish clove garlic minced
- 1 tsp Dijon mustard
Directions
In a bowl, add the ingredients. Mix using a broad-bottomed spoon. While mixing, crush the garlic with the bottom of the spoon against the bowl to release flavor.
Variations
As much as I’m a fan of experimentation, this is one recipe that is just about perfect as is. Each component is integral and balanced in its proportions. A quality olive oil is the only oil to use. Red wine vinegar, unless you prefer balsamic (too strong and bitter to my taste) is the only choice as well. The dijon mustard is also an important part of the flavor–don’t be tempted to leave it out. If you scale the recipe, be careful to keep the proportions of two parts oil to one part vinegar.
The only addition I’ve tried that has worked on occasion is up to one teaspoon of a freshly chopped herb: chives or thyme or basil, for example. But one at a time, not all three. And fresh only…leave the dried stuff out. If you do add an herb, as with the garlic, use a spoon to crush it against the bottom of the bowl, releasing flavor.
Especially if you are using this as a marinade for white meat, you might consider adding a little fresh lemon or lime juice.
Cook’s Illustrated White Layer Cake
 Some years ago I wanted to make a white layer cake for my wife’s birthday. I came across this recipe and found it excellent. The cake is light and moist, and has a delicious nutty, almond flavor.
Note that this recipe is for the cake only–not icing.
- Prep Time: 20 minutes
- Baking Time: 25 minutes
- Cooling Time (before icing): 90 minutes
- Servings: 12
Ingredients
- 2 1/4 cups cake flour (9 ounces), plus more for dusting the pans
- 1 cup whole milk, at room temperature
- 6 large egg whites (3/4 cup), at room temperature
- 2 teaspoons almond extract
- 1 teaspoon vanilla extract
- 1 3/4 cups granulated sugar (12 1/4 ounces)
- 4 teaspoons baking powder
- 1 teaspoon table salt
- 12 tablespoons unsalted butter (1 1/2 sticks), softened but still cool
Directions
- Set oven rack in middle position. (If oven is too small to cook both layers on a single rack, set racks in upper-middle and lower-middle positions.) Heat oven to 350 degrees.
- Spray two 9-inch round cake pans with nonstick cooking spray; line the bottoms with parchment or waxed paper rounds. Spray the paper rounds, dust the pans with flour, and invert pans and rap sharply to remove excess flour.
- Pour milk, egg whites, and extracts into 2-cup glass measure, and mix with fork until blended.
- Mix cake flour, sugar, baking powder, and salt in bowl of electric mixer at slow speed. Add butter; continue beating at slow speed until mixture resembles moist crumbs, with no powdery streaks remaining.
- Add all but 1/2 cup of milk mixture to crumbs and beat at medium speed (or high speed if using handheld mixer) for 1 1/2 minutes. Add remaining 1/2 cup of milk mixture and beat 30 seconds more. Stop mixer and scrape sides of bowl. Return mixer to medium (or high) speed and beat 20 seconds longer.
- Divide batter evenly between two prepared cake pans; using rubber spatula, spread batter to pan walls and smooth tops.
- Arrange pans at least 3 inches from the oven walls and 3 inches apart. (If oven is small, place pans on separate racks in staggered fashion to allow for air circulation.) Bake until thin skewer or toothpick inserted in the center comes out clean, 23 to 25 minutes.
- Let cakes rest in pans for 3 minutes. Loosen from sides of pans with a knife, if necessary, and invert onto wire racks. Reinvert onto additional wire racks. Let cool completely, about 1 1/2 hours.
Preparation/Baking Notes
- If you have forgotten to bring the milk and egg white mixture to room temperature, set the bottom of the glass measure containing it in a sink of hot water and stir until the mixture feels cool rather than cold, around 65 degrees.
- Cake layers can be wrapped and stored for one day.
- Once assembled, the cake should be covered with an inverted bowl or cake cover and refrigerated.
Smokin’ Scovilles Turkey Chili
 This is an absolutely delicious chili recipe that I found on the internet some years back and continue to make because, man, it’s great. It uses ground turkey, which makes it lower in fat and less greasy than beef-based chili. But what really makes this chili special is its complex taste: a combination of traditional Mexican spices combine with sweetness (from cocoa and worcestershire sauce), smoke (from smoked chipotle peppers), and tanginess (from beer) to create a truly interesting mix of flavors . It also has (for most folks) just the right amount of heat: a discernable bite, like a good chili should, but not so much that it overwhelms or detracts from the rich flavors.
The recipe below is close to the original that I found on the internet, with only a few changes (such as the substitution of smoked chipotle peppers for smoke sauce). If you want to read the original recipe, it’s here.
- Prep Time: 30 minutes
- Baking Time: 60 minutes
- Servings: Makes 1 gallon of chili, or about 12 servings
Ingredients
- 4 tablespoons olive oil
- 2 onions, chopped
- 10 cloves garlic, minced
- 4 small green bell peppers, seeded and chopped
- 2 habanero pepper, seeded and chopped
- 4 pounds lean ground turkey
- 4 tablespoons chili powder
- 4 teaspoons red pepper flakes
- 2 tablespoons paprika
- 2 tablespoons ground cumin
- 4 teaspoons dried oregano
- 2 teaspoons ground black pepper
- 2 (1 ounce) envelopes instant hot chocolate mix
- 4 teaspoons seasoned salt
- 2 tablespoon Worcestershire sauce
- 1 8 oz can smoked chipotle peppers
- 4 (14.5 ounce) cans diced tomatoes with green chile peppers, drained
- 2 (8 ounce) can tomato sauce
- 2 (15 ounce) can kidney beans, drained
- 8 oz beer
- 1 cup canned whole kernel corn (I prefer white corn)
Directions
- Dice the green peppers and onions. Mince the garlic and habanero.
- Measure out all of the dry spices and herbs (chili powder, red pepper flakes, paprika, cumin, oregano, pepper, hot cocoa mix and seasoned salt) into a bowl and set aside.
- Heat the olive oil in a large saucepan over medium heat. Add the onion, garlic, green peppers and habanero pepper; cook and stir until the onion is transparent. Push these to one side of the pot, and crumble in the ground turkey. Cover, and cook for about 5 minutes, stirring occasionally, or until the meat is no longer pink. Stir everything together so the garlic doesn’t burn.
- Add the spice/herb mix. Stir in Worcestershire sauce, diced tomatoes with green chilies, tomato sauce and kidney beans. Dice the chipotle peppers and add them along with the sauce from the can. Crack open a beer, and pour in about 2/3. Drink or discard the rest. Partially cover the pan, and simmer over medium heat for about 50 minutes, stirring occasionally.
- Mix in the corn, and simmer for about 10 more minutes. Remove from the heat and allow to cool for a few minutes before serving.
Preparation/Cooking Notes
- Like any chili, you can continue to cook this over low heat for a much longer time if you prefer.
- You can substitute regular salt for the seasoned salt and probably won’t notice the difference.
Recipe Variations
The first time you make it, I recommend sticking to the recipe to experience that result. After that you can try varying it, including turning the heat up or down to your taste. Try more or different types of beans.
Serving Notes
A great dish almost anytime, by itself or served with nachos, over rice, or with French bread. If it’s a little too hot, try topping with grated cheese or sour cream (also note that the heat tends to recede after the first day.) Makes great tacos and burritos. Freezes and keeps very well.
Richard’s Casserole
This simple, hearty dish was a favorite of my father’s to prepare. It easy and fast to make, feeds a family, and may be even tastier as a leftover. I’ve never known anyone who hasn’t enjoyed it. The original recipe includes meat, but you can make a vegetarian version that remains filling and flavorful enough to satisfy any meat-lover.
- Prep Time: 30 minutes
- Baking Time: 30 minutes
- Servings: 8
Ingredients
- 1 16 oz boxes of elbow macaroni
- 2 lbs hamburger
- 1 lb sliced American cheese
- 2-4 medium cloves garlic (minced)
- 2 28 oz cans whole tomatoes
- 2 medium onions, diced
- 1/4 stick butter
- 2 tbsp olive oil
- 1 tsp salt
- 1/2 tsp black pepper
Other Necessaries
- Casserole dish approx 10″ x 16″ x 3″
- Cover for dish or aluminum foil
Instructions
- Boil the noodles, following directions for al dente. When done, place in colander and spray with cool water to halt cooking. Allow to drain and cool.
- Crumble the hamburger into a heated sauté pan. Cook over medium heat for several minutes until light brown, taking care not to overcook. When done, place cooked meat in a colander to drain off grease.
- Clean any grease out of the sauté pan and add and heat the olive oil. Add the onion and then a little later the garlic. Sautee until the onion is translucent.
- Add the hamburger to the onion/garlic mix and cook for an another minute or two, tossing and mixing the ingredients to distribute the flavors. Do not over cook. Remove the pan from the heat.
- Preheat oven the 350 degrees.
- In a large stock pot or mixing bowl, add the cooked noodles and the onion/garlic/hamburger mix. Add the salt and pepper.
- Use a knife or your hands cut or tear the whole tomatoes into dice-sized (or slightly larger) chunks and add to the mix. Or you can just squeeze them in your fists after adding them to the bowl.) Also pour in the juice from the cans. Toss all ingredients with a spoon, mixing well.
- Butter the bottom and sides of the casserole dish. Add half of the mixture to the dish. Use a spatula or spoon to spread it evenly over the bottom and compress it lightly.
- Cover the entire surface of the casserole with slices of cheese. Then pour in and distribute the rest of the mix, and cover it with cheese as well.
- Cover the casserole with a lid or aluminum foil and place in the over. Create a little space between the foil and the casserole so that the cheese doesn’t stick to it when it melts.
- After 20 minutes, remove the cover, reduce hear to 325, and cook an additional 5 minutes or until top is nicely browned.
Preparation/Cooking Notes
- For best consistency, when boiling the noodles, boil one minute less than the noodles’ al dente instructions call for (the subsequent baking will make up for this). Over-boiling will result in a mushy casserole.
- For best results, allow the noodles to dry completely before mixing with the other ingredients. You can even cook them a day ahead of time. Doing this will allow the other ingredients to bind with the noodles.
- The casserole can be prepared ahead of time and kept in fridge for baking later. You may need to extend the oven time a bit in this event.
Recipe Variations
- According to your tastes, you can substitute other ingredients for the hamburger (ground turkey, for example) . For a vegetarian version, diced portabella mushroom works quite well.
- You can try different cheeses, although the mildness of American cheese works quite well here. To add a little tanginess, add a few slices of Swiss or cheddar while still using a “base” of American cheese.
- Do NOT substitute spaghetti sauce for the whole tomatoes–doing so overwhelms the delicate mix of flavors in the dish.
Serving Notes
A green salad and a red wine make a great accompaniment to this dish.