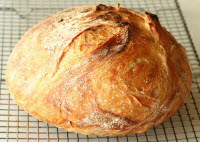
 No Knead Bread
 This bread was originally introduced to me by my brother Dan, who read about it in the New York Times. Extremely easy to make, absolutely delicious, and open to endless variations. All it takes to make is patience and a willingness to experiment. The results will rival the best bread you get at bakeries, if not surpass them. It’s also a wonderful group project if you have children 6 or older, allowing each child to make his or her own loaf.
- Prep Time: 10 minutes
- Rise Time: 12-18 hours + another 2 hours
- Baking Time: 45-60 minutes
- Servings: One 1½-pound loaf
Ingredients
- 3 cups all-purpose or bread flour, more for dusting
- ¼ teaspoon yeast
- 1¼ teaspoons salt
- 3-4 drops to 1/4 tsp red wine vinegar
- 1 and 5/8 cups very warm (almost hot) water
- Cornmeal or wheat bran as needed.
Other Necessaries:
- Plastic wrap
- Cotton towel (see preparation notes for alternative)
- A covered baking vessel (dutch oven, corningware, loaf pan w/ foil)
Directions
-
In a large bowl combine flour, yeast and salt. Add 1 5/8 cups water and red wine vinegar, and stir until blended; dough will be shaggy and sticky. Cover bowl with plastic wrap. Let dough rest at least 12 hours, preferably about 18, at warm room temperature, about 70 degrees.Dough is ready when its surface is dotted with bubbles.
-
Lightly flour a work surface and place dough on it; sprinkle it with a little more flour and fold it over on itself once or twice. Cover loosely with plastic wrap and let rest about 15 minutes.
-
Using just enough flour to keep dough from sticking to work surface or to your fingers, gently and quickly shape dough into a ball. Grease a mixing bowl and generously coat with flour, wheat bran or cornmeal; put dough in bowl and dust with more flour, bran or cornmeal. Cover and let rise for about 2 hours. When it is ready, dough will be more than double in size and will not readily spring back when poked with a finger.
-
At least a half-hour before dough is ready, heat oven to 450 degrees. Put a 6 to 8 quart heavy covered pot (cast iron, enamel, Pyrex or ceramic) in oven as it heats. When dough is ready, carefully remove pot from oven and empty dough into pot. You may have to scoop some of the dough out with your hands or a spoon and it may look like a mess, but that is O.K. Shake pan once or twice if dough is unevenly distributed; it will straighten out as it bakes. Cover with lid and bake 30 minutes, then remove lid and bake another 15 to 30 minutes, until loaf is beautifully browned. Cool on a rack.
Preparation/Cooking Notes
- The original recipe calls for instant yeast, but at Dan’s recommendation I’ve used regular yeast and seen little difference in how the bread comes out.
- If you read around on the web, you’ll find a lot of people experimenting with shorter rise times, in some cases increasing the yeast, sometimes not. One cook used a shorter rise time (just a few hours) with no added yeast but suggested a narrower bowl. Another cook even claimed excellent results letting her dough rise while in the fridge. So experiment, but I’d try the original recipe first. If it’s winter and your rooms don’t come close enough to 70 degrees, try placing the bowl atop an appliance (like the fridge), in an unheated over, or even atop a radiator.
- One thing I’ve never quite figured out…I always expect this bread to rise more than it does. My loaves are consistently four to five inches at their highest point. Maybe that’s as should be, but I wish I could get them a little higher. I’ve tried tweaking the amount of yeast, elongating the rise time, warming the rising bread, but it largely has not made a difference.
- For steps 2 and 3, wetting your hands will help prevent the dough from sticking to them.
- Step 3 originally called for a cotton towel, not a greased mixing bowl. I made the change after finding the dough stuck to the towel too often.
Variations
The possibilities are almost limitless, from flours you can use, to herbs, spices, and other additions you can mix into the dough, to toppings for the crust. I’ll add a few of the things I’ve tried later.
Serving Notes
This bread, amazingly, actually gets better over the course of several days. One caution: unless you’re very, very good, wait for it to cool fully before attempting to slice sandwich-thin.
This came out delicious! Thanks Mike for showing us how to bake this yummy bread.